Now, I had been planning this birthday party for about 3 months prior to the actual day (yes, a quarter of her life!!). Not because I wanted something huge and over the top but more to try and fit it into a rather tight budget!! I wanted something cute but I didn't want the usual 'I can find it anywhere' preprinted part products. Google images became my new best friend!! I came up with the idea of a garden themed party and I also love the new trend of lolly and dessert buffets.
Below are the photos from the day and underneath I have put any of the links I used to make, bake or sew what you see. I spread the purchases through my weekly grocery shop over a couple of months so there wasn't a huge expense the week before. All in all, I didn't spend a huge amount and it turned out just how I imagined it!!
The invitation is the first impression your guests get of the celebration. I love scrapbooking (and have a LOT of supplies at home), so I always make my invitations. These were made using cardstock I already had at home. Making your own is always something to consider as invitations can get VERY expensive!! The colours of the invitation were the colours carried through to the day.
The birthday girl in her tutu dress. These are so easy to make - no sewing at all!! Just google how to make a tutu dress!! I got a crocheted headband from the cheap shop and attached the tulle to this. Total cost - about $5!! I made a singed flower headband to match. Now, my Olivia is not one for this dress - in fact, she hated it!! Because she is up and walking, she kept tripping on it. We ended up changing her after half an hour!!
The dessert buffet!! In keeping with the colours from the invitations (light pink, dark pink, blue and a splash of green), I created a table that the guests could fill their own lolly bags from. The CHinese paper lanterns were from my local bargain store for $2.99 each (Online these can go for up to $10 each!!). The paper flowers on the front are made from tissue paper added each week to my groceries. Google tissue paper flowers and see all the tutorials you come up with!! I even had my 5 year old helping me with these!!
A top view of the table. The flowers you can see are sugar cookies. I got the recipe from www.taste.com.au. I love websites like these because they give reviews and ratings and suggestions for improving the recipe. You can also convert the recipe to the quantities you need. Now, as I was standing at my kitchen bench icing the night before, I didn't really think the flowers through!! They each are made of 1 large flower and 8 small petals. All cookies, all needing individual icing! As I needed about 24 cookies i was faced with the task of icing over 150 petals!! I am not sure these cookies will make it onto another table in such great quantities!!
The paper goody bags were an ebay purchase from the store Bags and Tags. I looked at all the beautiful lolly bags online (the pink spotty and stripy ones). They were so beautiful but I couldn't justify spending $25 on 24 bags!! I went for the plain white ones and I think they worked just as well!! I also found little pink clothes pegs to close them up. Very cute and another ebay bargain!!
The table cloth is plastic from my local bargain store and the white and pink spot table runner is fabric I already had at home. The one splurge I made was the glass vases. I looked online at hiring these jars but it was either pay about $10 each to hire really fancy ones or these cost between $5 and $12 at the reject shop. The glass cupcake stands were a one off from Woolworths for $7.95 each - BARGAIN!! (If anyone needs jars like this I am more than happy to loan them!!).
Sticking to the pink and white theme, we had the following treats. All the labels and cupcake toppers were made to match the theme:
Musk sticks........ (Daddy's favourites!!)... you can also get a glimpse of the homemade meringues to the side)
Fairy Floss.......
Marshmallows (you can see the flower sugar cookies a little better int his pic!)
Homemade cupcakes (chocolate and vanilla) with butter frosting.....
There was also homemade coconut ice and freddo frogs!!
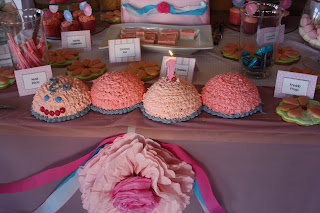
The pride and joy of the table - the cake!!!
The dessert buffet was a hit!!
Throw in some classic party games, a family members jumping castle and lots of friends and family and it was a lovely day!! Nothing too over the top but something special!!
If you would like help with styling your next party, please don't hesitate to ask - I LOVE it!!
I hope you enjoyed Olivia's 1st Birthday Garden party!!


